


Project Goal & Target User
The challenge we were faced with was how to meet the consumers' needs. Common issues that surfaced during interviews were: over-watering, root rot, under-watering, light exposure, & lack of experience.
Through our consumer research, we also found popular house plants. Succulents were the most popular plant by far, but so were cacti, aloe vera, pothos, and herbs including basil, mint, and chives. We quickly realized that our ideal consumers were going to use a variety of plants with differing moisture and sunlight needs.
Not only did we have to design a product based on user interaction, but we would also had to design something that would be compatible with multiple types of plants.
Design Constraints
Important to note, our design process was limited by two factors, the materiality of our product and the size of our product.
Our team was gifted acrylic sheets by The Norwood Public School District with the intention of repurposing. So, one design constraint was that it must include this clear acrylic. We were faced with all the same material challenges as the Norwood Stencil project.
Because our target users were made up of entirely indoor gardeners, we needed our product to be fit for indoor use. We decided that an appropriate product size would fit on the average home's windowsill. This is an ideal spot for houseplants to be kept. We thought a six inch average would be an appropriate size constraint.
Market Research & Inspiration Board | Approach
Our first approach to solving the large quantity of user issues was to use a greenhouse as inspiration. However, the team soon realized that the greenhouse approach would create too many creative barriers, so the design was refocused with self watering planters as our inspiration.
In order to reduce plastic waste, we decided to incorporate another design constraint. We wanted to use standard nursery pots as a part of our design.

Sketching Process
For the self-watering approach, I as the teams' designer had more freedom to play with form. This sketching process was a way to explore form for the product, I knew I wanted to take a hexagonal approach.
.jpg)
.jpg)
.jpg)

Photoshop Renders
The wooden covering concept created in this photoshop render intrigued the team and many of our customers, so we explored this concept more in simpler form language.


Modeling Process
Retro Square Model:
The first of the new wooden covered designs was a rounded square planter with retro design influences. The goal was to provide the user with a way to see the water level within the acrylic planter, a window. This design takes that approach very literally, although this cut-out does not make it into the final design.


Modeling Process
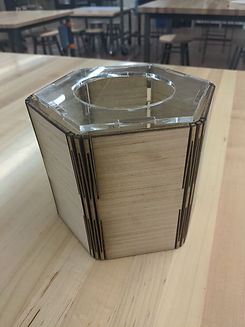
Hexagonal Model:
For the hexagonal model, we hoped that the shape would provide for a tile-able effect. This way, users could place multiples of the product alongside one another, effectively creating an indoor garden.


Prototyping Process
Retro Square Model:
The prototyping process started by laser-cutting the 3D file and assembling the newly cut acrylic panels. These panels were temporarily taped together and the attached using advanced silicone. By using silicone, the panels were not only adhered to one another, but the entire planter was made waterproof.
The planter was then stress tested to see if it was capable of supporting the weight of a houseplant and soil, which we determined it was.


Prototyping Process
Hexagonal Model:
The hexagonal model was where we began implementation of the wooden outer shell. Before creating the first prototype, we researched many joinery outlets. We decided on a living hinge design, this would allow for an easy way to curve the wooden cover around the acrylic body.

Prototyping Process
Retro Square Model & Hexagonal Model:
Our second wooden cover prototype was sturdier and did not include the living hinge feature. With this prototype, the team devised a way to combat the scratches on our repurposed acrylic sheets. We thought a "fogged" look may be visually appealing. This technique was very effective when hiding material imperfections.


**Unfortunately, shortly after beginning our prototyping process the team was informed that our client would no longer be continuing with this product. So instead, as a 3d Designer, I took it upon myself to create conceptual renders of what the final product would look like.


